开整!
Step1 初始化
本项目基于环信超级社区的实例项目, 所以我们先从Circle-Demo-Web这个仓库开启做初始化
克隆项目 git clone https://github.com/easemob/Circle-Demo-Web.git
安装依赖 npm install
设置appKey src/utils/WebIM.js 中设置appKey,AppKey为环信后台项目对应的key,注册环信,https://console.easemob.com/user/register,登录console后台获取Appkey
appKey为环信后台项目对应的key, 如何开通可见开通配置环信即时通讯 IM 服务
运行项目 npm run start
运行后, 登录完毕效果如下,

与discord设计逻辑相似, 左边功能区有
个人信息页
好友会话页
当前加入的频道
创建新频道
加入服务器
超级社区的逻辑为
社区(Server)、频道(Channel) 和子区(Thread) 三层结构
社区为一个独立的结构, 不同社区直接相互隔离, 社区包含不同的频道, 代表了不同的话题, 用户在频道中聊天, 而针对一条单独信息产生的回复为子区.
我们本次的项目主要集中在频道部分, 需要加入一个服务器后, 创建一个测试社区, 保证你具有管理员权限.
Step2 协议设置
我们的目标是尽量利用现有api扩展功能, 有几个问题需要解决
如何区分普通频道和游戏频道?
如何区分当前频道是否有玩家直播, 如果有直播如何获取玩家信息, 第二玩家的状态?
多人聊天的状态?
如何区分普通频道和游戏频道
这里直接简单采用频道前缀做特殊区分, 创建频道前缀带video-的识别为游戏频道, 同时将渲染内容做替换
// views/Channel/index.js
const isVideoChannel = useMemo(() => {
return currentChannelInfo?.name?.startsWith("video-");
}, [currentChannelInfo]);
const renderTextChannel = () => {
// 原来的渲染逻辑
return (
  <>
<MessageList
  messageInfo={messageInfo}
  channelId={channelId}
  handleOperation={handleOperation}
  className={s.messageWrap}
/>
<div className={s.iptWrap}>
  <Input chatType={CHAT_TYPE.groupChat} fromId={channelId} />
</div>
  </>
);
}
const renderStreamChannel = () => {
// 先填充一个占位符
return (
<>This is a Stream Channel<>
);
}
return (
...
<div className={s.contentWrap}>
{isVideoChannel ? renderStreamChannel() : renderTextChannel()}
</div>
...
);
如果需要区分图标, 可以搜索channelNameWrap, 分别在channelItem和Channel/components/Header中添加一个css类, 通过这个类设置图标图片
如何区分当前频道是否有玩家直播, 如果有直播如何获取玩家信息, 第二玩家的状态?
我们可以复用在频道中发送消息的机制, 直播开始, 结束都可以当做一条特殊的消息发送, 只不过这条消息不承载用户的信息, 而是表达用户上下播的行为
当然这个机制存在一定实时性的问题, 不过大致是可行的.
首先我们来看一条普通的消息是如何发送的
  // components/input

 //发消息
  const sendMessage = useCallback(() => {
    if (!text) return;
    getTarget().then((target) => {
      let msg = createMsg({
        chatType,
        type: "txt",
        to: target,
        msg: convertToMessage(ref.current.innerHTML),
        isChatThread: props.isThread
      });
      setText("");
      deliverMsg(msg).then(() => {
        if (msg.isChatThread) {
          setThreadMessage({
            message: { ...msg, from: WebIM.conn.user },
            fromId: target
          });
        } else {
          insertChatMessage({
            chatType,
            fromId: target,
            messageInfo: {
              list: [{ ...msg, from: WebIM.conn.user }]
            }
          });
          scrollBottom();
        }
      });
    });
  }, [text, props, getTarget, chatType, setThreadMessage, insertChatMessage]);
去除掉与输入框逻辑耦合的部分, 可以分为两步, createMsg创建消息, deliverMsg发送消息, 这两个功能都是环信SDK功能的封装, 经过查阅文档, 它支持发送自定义消息.
在utils中新建一个stream.js文件来封装直播的逻辑
// utils/stream.js
const sendStreamMessage = (content, channelId) => {
  let msg = createMsg({
    chatType: CHAT_TYPE.groupChat,
    type: "custom",
    to: channelId,
    ext: {
      type: "stream",
      ...content,
    },
  });
  return deliverMsg(msg)
    .then(() => {
      console.log("发送成功");
    })
    .catch(console.error);
};
它接收content表示我们的额外信息, 用户名和上下播状态, channelId区分不同的channel, 对它的调用可以如下
// 定义在 utils/stream.js 中
const CMD_START_STREAM = "start";
const CMD_END_STREAM = "end";

// 上播
sendStreamMessage(
	{
	  user: userInfo?.username,
	  status: CMD_START_STREAM,
	},
	channelId
);
// 下播
sendStreamMessage(
  {
	user: userInfo?.username,
	status: CMD_END_STREAM,
  },
  channelId
);// components/CustomMsg/index.js
const isStream = message?.ext?.type === "stream";
// 屏蔽
const renderStream = () => {
return (<>)
}
if (isStream) {
return renderStream();
} else {
...
}多人聊天的状态?
注册声网开发者, 并在后台创建一个测试项目
项目根目录创建
.env文件, 存放api token等信息
# channel, uid 暂时设置为固定
REACT_APP_AGORA_APPID = your app id
REACT_APP_AGORA_CHANNEL = test
REACT_APP_AGORA_TOKEN = your token
REACT_APP_AGORA_UID = 123xxx
3. 添加声网sdk依赖npm install agora-rtc-sdk-ng
我们在下一章中编写接入逻辑
声网RTC接入, 直播与语音实现
接入
在views/Channel/components文件夹下新增一个组件StreamHandler, 该组件为后续我们处理游戏房间的组件, 先初步编写声网接入逻辑
// views/Channel/components/StreamHandler/index.js

const options = {
  appId:
    process.env.REACT_APP_AGORA_APPID || "default id",
  channel: process.env.REACT_APP_AGORA_CHANNEL || "test",
  token:
    process.env.REACT_APP_AGORA_TOKEN ||
    "default token",
  uid: process.env.REACT_APP_AGORA_UID || "default uid",
};

const StreamHandler =  (props) => {
  // 组件参数: 用户信息, 当前频道所有消息, 当前频道id, 是否开启本地语音
  const { userInfo, messageInfo, channelId, enableLocalVoice = false } = props;

  const [rtcClient, setRtcClient] = useState(null);
  // 声网client连接完成
  const [connectStatus, setConnectStatus] = useState(false);

  // RTC相关逻辑
  useEffect(() => {
    AgoraRTC.setLogLevel(3);
    const client = AgoraRTC.createClient({ mode: "rtc", codec: "vp8" });
    // TODO: use right channel
    client
      .join(options.appId, options.channel, options.token, userInfo?.username)
      .then(() => {
        setConnectStatus(true);
        console.log("[Stream] join channel success");
      })
      .catch((e) => {
        console.log(e);
      });

    setRtcClient(client);
    return () => {
      // 销毁时, 自动退出RTC频道
      client.leave();
      setRtcClient(null);
    };
  }, []);

  return (
	<>
	  {!connectStatus && <Spin tip="Loading" size="large" />}
	</>
  );
}


// 我们需要全局状态中的userinfo, 映射一下到当前组件的props中
const mapStateToProps = ({ app }) => {
  return {
    userInfo: app.userInfo,
  };
};
export default memo(connect(mapStateToProps)(StreamHandler));然后回到Channel中, 在之前的renderStreamChannel函数中添加上StreamHandler组件
// view/Channel/index.js
const [enableVoice, setEnableVoice] = useState(false);
const toggleVoice = () => {
	setEnableVoice((enable) => {
	  return !enable;
	});
}

// 保留了输入窗口, 可以在它的菜单栏中添加游戏频道独有的一些逻辑,
// 这里我加入了开关本地语音的逻辑, 拓展Input的细节可以参照完整版代码
const renderStreamChannel = () => {
    return (
      <>
        <div className={s.messageRowWrap}>
		  <StreamHandler messageInfo={messageInfo} channelId={channelId} enableLocalVoice={enableVoice} />
        </div>
        <div className={s.iptWrap}>
          <Input chatType={CHAT_TYPE.groupChat} fromId={channelId} extraMenuItems={renderStreamMenu()} />
        </div>
      </>
    );
  }

const renderStreamMenu = () => {
    return [
      {
        key: "voice",
        label: (
          <div
            className="circleDropItem"
            onClick={toggleVoice}
          >
            <Icon
              name="person_wave_slash"
              size="24px"
              iconClass="circleDropMenuIcon"
            />
            <span className="circleDropMenuOp">
              {enableVoice ? "关闭语音" : "开启语音"}
            </span>
          </div>
        ),
      }
    ];
  }
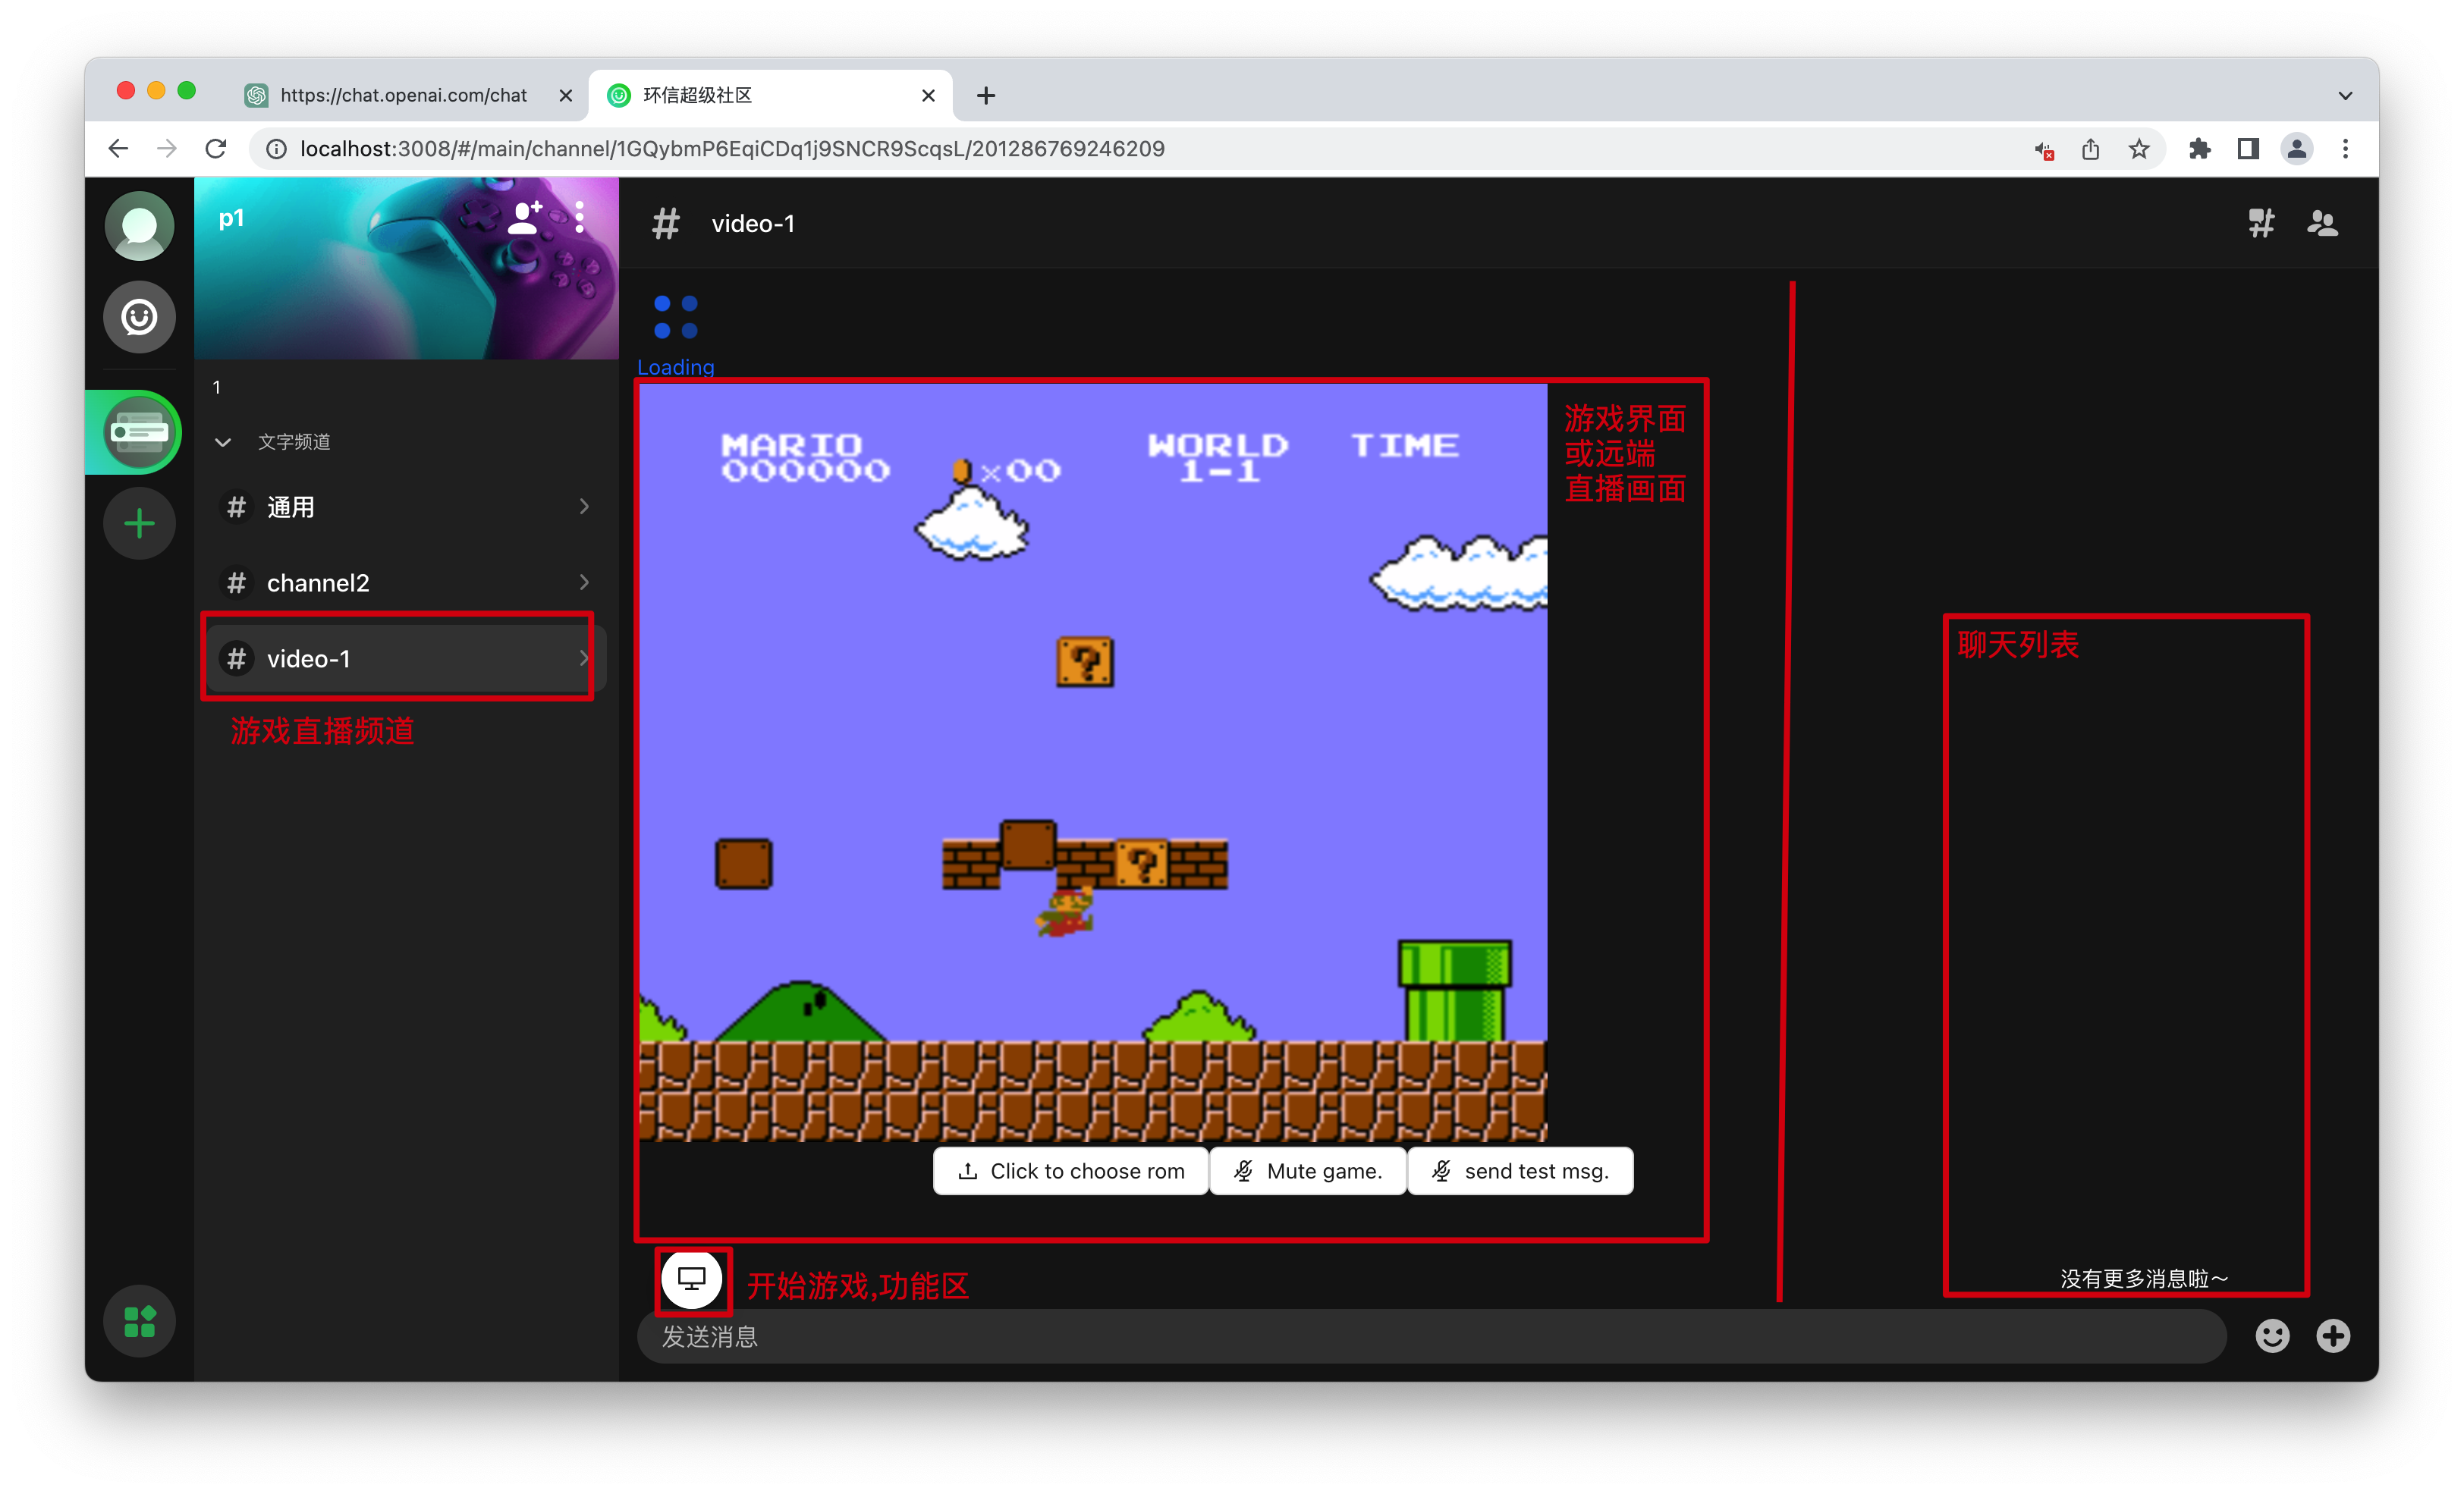
此时我们创建一个video-开题的游戏频道, 应该可以看到命令行中输出了RTC连接成功信息. [Stream] join channel success
音视频推流
参考以下步骤实现音视频通话的逻辑:

1、调用 createClient 方法创建 AgoraRTCClient 对象。
2、调用 join 方法加入一个 RTC 频道,你需要在该方法中传入 App ID 、用户 ID、Token、频道名称。
3、先调用 createMicrophoneAudioTrack 通过麦克风采集的音频创建本地音频轨道对象,调用 createCameraVideoTrack 通过摄像头采集的视频创建本地视频轨道对象;然后调用 publish 方法,将这些本地音视频轨道对象当作参数即可将音视频发布到频道中。
4、当一个远端用户加入频道并发布音视频轨道时:
5、监听 client.on(“user-published”) 事件。当 SDK 触发该事件时,在这个事件回调函数的参数中你可以获取远端用户 AgoraRTCRemoteUser 对象 。
6、调用 subscribe 方法订阅远端用户 AgoraRTCRemoteUser 对象,获取远端用户的远端音频轨道 RemoteAudioTrack 和远端视频轨道 RemoteVideoTrack 对象。
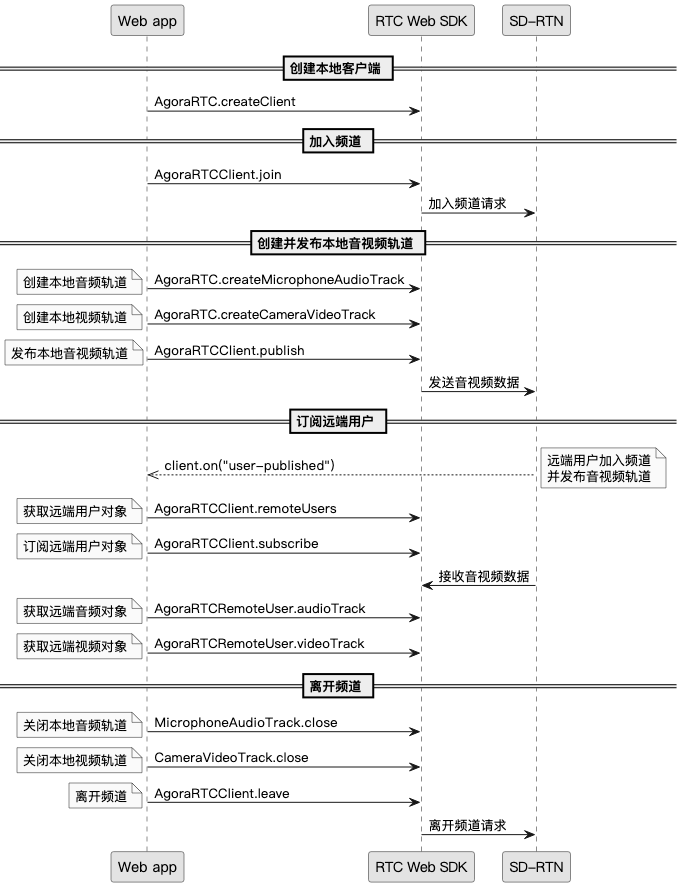
(以上内容来自声网官方文档)
在上面的接入中, 我们已经完成了创建对象并加入频道两步.
在RTC中, 可以传输音频和视频信号, 由于单个RTC客户端要传输不同种类的数据, 每个单独的音视频源被分成不同的track(由于它们都是实时不断产生的, 我们称作流), 随后通过publish方法, 将我们本地的信号源交付给RTC客户端传输.
随后通过user-published事件的回调来在其他用户发布信号源时进行处理, 首先需要subscribe该用户来获取后续数据, 随后根据不同类型的信号流做处理.
离开时需要关闭本地当前的信号源, 并退出RTC客户端.
最后通过user-unpublished事件监听其他用户退出, 移除它们对应的信号流.
逻辑理清楚后代码就很容易看懂了
// views/Channel/components/StreamHandler/index.js
const StreamHandler = (props) => {
  ...
  // 本地视频元素
  const localVideoEle = useRef(null);
  // 远程视频元素
  const canvasEle = useRef(null);
  const [rtcClient, setRtcClient] = useState(null);
  const [connectStatus, setConnectStatus] = useState(false);
  // 当前直播的用户
  const [remoteUser, setRemoteUser] = useState(null);
  // 远程音视频track
  const [remoteVoices, setRemoteVoices] = useState([]);
  const [remoteVideo, setRemoteVideo] = useState(null);

  // RTC相关逻辑
  useEffect(() => {
    ...
    // client.join 后

	// 监听新用户加入
    client.on("user-published", async (user, mediaType) => {
      // auto subscribe when users coming
      await client.subscribe(user, mediaType);
      console.log("[Stream] subscribe success on user ", user);
      if (mediaType === "video") {
        // 获取直播流
        if (remoteUser && remoteUser.uid !== user.uid) {
          // 只能有一个用户推视频流
          console.error(
            "already in a call, can not subscribe another user ",
            user
          );
          return;
        }
        // 播放并记录下视频流
        const remoteVideoTrack = user.videoTrack;
        remoteVideoTrack.play(localVideoEle.current);
        setRemoteVideo(remoteVideoTrack);
        // can only have one remote video user
        setRemoteUser(user);
      }
      if (mediaType === "audio") {
        // 获取音频流
        const remoteAudioTrack = user.audioTrack;
        // 去重
        if (remoteVoices.findIndex((item) => item.uid === user.uid) == -1) {
		  remoteAudioTrack.play();
          // 添加到数组中
          setRemoteVoices([
            ...remoteVoices,
            { audio: remoteAudioTrack, uid: user.uid },
          ]);
        }
      }
    });

    client.on("user-unpublished", (user) => {
      // 用户离开, 去除流信息
      console.log("[Stream] user-unpublished", user);
      removeUserStream(user);
    });
    setRtcClient(client);
    return () => {
      client.leave();
      setRtcClient(null);
    };
  }, []);

  const removeUserStream = (user) => {
    if (remoteUser && remoteUser.uid === user.uid) {
      setRemoteUser(null);
      setRemoteVideo(null);
    }
    setRemoteVoices(remoteVoices.filter((voice) => voice.uid !== user.uid));
  };
}
接着我们根据之前提到的自定义消息判断当前在播状态, 以最后一条自定义消息为准.
// views/Channel/components/StreamHandler/index.js
const StreamHandler = (props) => {
  const { userInfo, messageInfo, channelId, enableLocalVoice = false } = props;

  // 第一条 stream 消息, 用于判断直播状态
  const firstStreamMessage = useMemo(() => {
    return messageInfo?.list?.find(
      (item) => item.type === "custom" && item?.ext?.type === "stream"
    );
  }, [messageInfo]);

  // 是否有直播
  const hasRemoteStream =
    firstStreamMessage?.ext?.status === CMD_START_STREAM &&
    firstStreamMessage?.ext?.user !== userInfo?.username;
  // 本地直播状态
  const [localStreaming, setLocalStreaming] = useState(
    firstStreamMessage?.ext?.status === CMD_START_STREAM &&
      firstStreamMessage?.ext?.user === userInfo?.username
  );

 // 本地直播流状态
  const toggleLocalGameStream = () => {
    if (hasRemoteStream) {
      return;
    }
    setLocalStreaming(!localStreaming);
  };
  // 根据直播状态选择渲染
  return (
    <>
      {!connectStatus && <Spin tip="Loading" size="large" />}
      {hasRemoteStream ? (
        <RemoteStreamHandler
          remoteUser={firstStreamMessage?.ext?.user}
          localVideoRef={localVideoEle}
          channelId={channelId}
          userInfo={userInfo}
          rtcClient={rtcClient}
        />
      ) : (
        <LocalStreamHandler
          localStreaming={localStreaming}
          canvasRef={canvasEle}
          toggleLocalGameStream={toggleLocalGameStream}
          rtcClient={rtcClient}
          userInfo={userInfo}
          channelId={channelId}
        />
      )}
    </>
  );
}我们根据hasRemoteStream分成两种逻辑RemoteStreamHandler和LocalStreamHandler(可以先用div+文字的空实现占位), 首先我们来看本地游戏的逻辑
// view/Channel/components/StreamHandler/local_stream.js
const LocalStreamHandler = (props) => {

  const {
    toggleLocalGameStream,
    canvasRef,
    localStreaming,
    rtcClient,
    userInfo,
    channelId,
  } = props;

  const [localVideoStream, setLocalVideoStream] = useState(false);
  const localPlayerContainerRef = useRef(null);

  // 开启本地视频流
  useEffect(() => {
    if (!localPlayerContainerRef.current) return;
    const f = async () => {
      // 暂时使用视频代替游戏流
      let lgs = await AgoraRTC.createCameraVideoTrack();
      lgs.play(localPlayerContainerRef.current);
      setLocalGameStream(lgs);
    }
    f();
  }, [localPlayerContainerRef])

  const renderLocalStream = () => {
    return (
	  <div style={{ height: "100%" }} ref={localPlayerContainerRef}>
	  </div>
    )
  }

  // 控制上下播
  const renderFloatButtons = () => {
    return (
      <FloatButton.Group
        icon={<DesktopOutlined />}
        trigger="click"
        style={{ left: "380px" }}
      >
        <FloatButton
          onClick={toggleLocalGameStream}
          icon={
            localStreaming ? <VideoCameraFilled /> : <VideoCameraOutlined />
          }
          tooltip={<div>{localStreaming ? "停止直播" : "开始直播"}</div>}
        />
      </FloatButton.Group>
    );
  };

  // 渲染: 悬浮窗和本地流
  return (
    <>
      <div style={{ height: "100%" }}>
        {renderFloatButtons()}
        {renderLocalStream()}
      </div>
    </>
  );
}
现在我们进入直播房间已经可以看到本地摄像头的内容了, 但我们还没有将视频流投放到RTC中, 且上播逻辑也没有处理
// view/Channel/components/StreamHandler/local_stream.js
  useEffect(() => {
    // 发布直播推流
    if (!localStreaming || !rtcClient || !localVideoStream) {
      return;
    }
    console.log("height", canvasRef.current.height);
    console.log("publishing local stream", localVideoStream);
    // 将流publish到rtc中
    rtcClient.publish(localVideoStream).then(() => {
      // 频道中发布一条消息, 表示开始直播
      sendStreamMessage(
        {
          user: userInfo?.username,
          status: CMD_START_STREAM,
        },
        channelId
      ).then(() => {
        message.success({
          content: "start streaming",
        });
      });
    });
    return () => {
      // 用户退出的清理工作,
      // unpublish流(远程), 停止播放流(本地), 发送直播关闭消息(频道)
      if (localVideoStream) {
        rtcClient.unpublish(localVideoStream);
        localVideoStream.stop();
        sendStreamMessage(
          {
            user: userInfo?.username,
            status: CMD_END_STREAM,
          },
          channelId
        );
        message.info({
          content: "stop streaming",
        });
      }
    };
  }, [rtcClient, localStreaming, canvasRef, userInfo, channelId, localVideoStream]);
为了测试直播效果, 我们需要登录第二个账号(使用浏览器的匿名/开其他的浏览器, 此时cookie没有共享, 可以多账号登录), 进入相同频道, 开启直播, 此时第一个账号应该会自动刷新状态(如果没有则手动切换一下频道), 进入到RemoteStreamHandler, 说明我们直播的逻辑已经完成.
本地语音的逻辑也是类似的, 这里就不再重复.
接下来是远程流的渲染逻辑, 它的逻辑相对简单, 观看者可以选择开始/停止观看直播流
// view/Channel/components/StreamHandler/remote_stream.js
const RemoteStreamHandler = (props) => {
const {
remoteUser,
localVideoRef,
toggleRemoteVideo,
channelId,
userInfo,
rtcClient,
} = props;
// 这里加一个强制t人的开关, 由于debug
const enableForceStop = true;
const forceStopStream = () => {
sendStreamMessage(
{
user: userInfo?.username,
status: CMD_END_STREAM,
},
channelId
);
};
const renderRemoteStream = () => {
return (
<div style={{ height: "100%" }}>
<div
id="remote-player"
style={{
width: "100%",
height: "90%",
border: "1px solid #fff",
}}
ref={localVideoRef}
/>
<div
style={{
display: "flex",
justifyContent: "center",
marginTop: "10px",
}}
>
<span style={{ color: "#0ECD0A" }}>{remoteUser}</span>
is playing{" "}
</div>
</div>
);
};
const renderFloatButtons = () => {
return (
<FloatButton.Group
icon={<DesktopOutlined />}
trigger="click"
style={{ left: "380px" }}
>
<FloatButton
onClick={toggleRemoteVideo}
icon={<VideoCameraAddOutlined />}
tooltip={<div>观看/停止观看直播</div>}
/>
{enableForceStop && (
<FloatButton
onClick={forceStopStream}
icon={<VideoCameraAddOutlined />}
tooltip={<div>强制停止直播</div>}
/>
)}
</FloatButton.Group>
);
};
return (
<>
<div style={{ height: "100%" }}>
{renderFloatButtons()}
{renderRemoteStream()}
</div>
</>
);
}开关远程流的代码在StreamHander中, 作为参数传给RemoteStream
// views/Channel/components/StreamHandler/index.js
  const toggleRemoteVideo = () => {
    if (!hasRemoteStream) {
      return;
    }
    console.log("[Stream] set remote video to ", !enableRemoteVideo);
    // 当前是关闭状态,需要打开
    // 开关远程音频的逻辑也与此类型.
    if (enableRemoteVideo) {
      remoteVideo?.stop();
    } else {
      remoteVideo?.play(localVideoEle.current);
    }
    setEnableRemoteVideo(!enableRemoteVideo);
  };
ok, 现在我们已经实现了基于声网RTC, 在环信超级社区集成视频直播的功能.
直播替换为游戏流
接下来我们来将直播流升级一下, 替换成模拟器包, 为了方便测试, 我们直接使用打包好的版本(https://github.com/a71698422/web-0.1.1 ), pkg包解压后直接放置到项目根目录,
RustNESEmulator 是一个基于Rust语言的NES模拟器, 我们在web平台可以使用它编译好的wasm版本
并将mario.nes文件放到src/assets目录下, 这是初代马里奥游戏的ROM文件(你也可以使用你喜欢的nes游戏, 如果遇到问题, 欢迎到RustNESEmulator中提issue)
加入前端的模拟器适配代码
// views/Channel/components/StreamHandler
// from tetanes.

import * as wasm from "@/pkg";
class State {
  constructor() {
    this.sample_rate = 44100;
    this.buffer_size = 1024;
    this.nes = null;
    this.animation_id = null;
    this.empty_buffers = [];
    this.audio_ctx = null;
    this.gain_node = null;
    this.next_start_time = 0;
    this.last_tick = 0;
    this.mute = false;
    this.setup_audio();
    console.log("[NES]: create state");
  }

  load_rom(rom) {
    this.nes = wasm.WebNes.new(rom, "canvas", this.sample_rate);
    this.run();
  }

  toggleMute() {
    this.mute = !this.mute;
  }

  setup_audio() {
    const AudioContext = window.AudioContext || window.webkitAudioContext;
    if (!AudioContext) {
      console.error("Browser does not support audio");
      return;
    }
    this.audio_ctx = new AudioContext();
    this.gain_node = this.audio_ctx.createGain();
    this.gain_node.gain.setValueAtTime(1, 0);
  }

  run() {
    const now = performance.now();
    this.animation_id = requestAnimationFrame(this.run.bind(this));
    if (now - this.last_tick > 16) {
      this.nes.do_frame();
      this.queue_audio();
      this.last_tick = now;
    }
  }

  get_audio_buffer() {
    if (!this.audio_ctx) {
      throw new Error("AudioContext not created");
    }

    if (this.empty_buffers.length) {
      return this.empty_buffers.pop();
    } else {
      return this.audio_ctx.createBuffer(1, this.buffer_size, this.sample_rate);
    }
  }

  queue_audio() {
    if (!this.audio_ctx || !this.gain_node) {
      throw new Error("Audio not set up correctly");
    }

    this.gain_node.gain.setValueAtTime(1, this.audio_ctx.currentTime);

    const audioBuffer = this.get_audio_buffer();
    this.nes.audio_callback(this.buffer_size, audioBuffer.getChannelData(0));
    if (this.mute) {
      return;
    }
    const source = this.audio_ctx.createBufferSource();
    source.buffer = audioBuffer;
    source.connect(this.gain_node).connect(this.audio_ctx.destination);
    source.onended = () => {
      this.empty_buffers.push(audioBuffer);
    };
    const latency = 0.032;
    const audio_ctxTime = this.audio_ctx.currentTime + latency;
    const start = Math.max(this.next_start_time, audio_ctxTime);
    source.start(start);
    this.next_start_time = start + this.buffer_size / this.sample_rate;
  }
  // ...
}

export default State;改造local_stream
// view/Channel/components/StreamHandler/local_stream.js

import mario_url from "@/assets/mario.nes";
import * as wasm_emulator from "@/pkg";
import State from "./state";

const LocalStreamHandler = (props) => {
  // 模拟器 state
  const stateRef = useRef(new State());

  // 注意要将原来的代码注释掉
  /*
  const [localVideoStream, setLocalVideoStream] = useState(false);
  const localPlayerContainerRef = useRef(null);

  // 开启本地视频流
  useEffect(() => {
    if (!localPlayerContainerRef.current) return;
    const f = async () => {
      // 暂时使用视频代替游戏流
      let lgs = await AgoraRTC.createCameraVideoTrack();
      lgs.play(localPlayerContainerRef.current);
      setLocalGameStream(lgs);
    }
    f();
  }, [localPlayerContainerRef])

  // 推流的函数也暂时注释
  useEffet...
  */

  useEffect(() => {
    // 本地游戏
    if (!canvasRef) {
      return;
    }
	// 开启键盘监听等全局事件
    wasm_emulator.wasm_main();
    fetch(mario_url, {
      headers: { "Content-Type": "application/octet-stream" },
    })
      .then((response) => response.arrayBuffer())
      .then((data) => {
        let mario = new Uint8Array(data);
        // 加载 rom数据
        stateRef.current.load_rom(mario);
      });
  }, [canvasRef]);

  // 更新本地流渲染
  const renderLocalStream = () => {
    return (
      <div style={{ height: "100%" }}>
        <canvas
          id="canvas"
          style={{ width: 600, height: 500 }}
          width="600"
          height="500"
          ref={canvasRef}
        />
      </div>
    );
  };
}
这一步完成后, 我们就可以在本地试玩马里奥游戏了, 键盘绑定为
A      = J
B      = K
Select = RShift
Start  = Return
Up     = W
Down   = S
Left   = A
Right  = D
将推本地视频流改为游戏流
  useEffect(() => {
    // 发布直播推流
    if (!localStreaming || !rtcClient) {
      return;
    }
    // 只修改了流获取部分
    // canvas的captureStream接口支持获取视频流
    // 我们用这个视频流构造一个声网的自定义视频流
    let stream = canvasRef.current.captureStream(30);
    let localVideoStream = AgoraRTC.createCustomVideoTrack({
      mediaStreamTrack: stream.getVideoTracks()[0],
    });
    console.log("height", canvasRef.current.height);
    console.log("publishing local stream", localVideoStream);
    rtcClient.publish(localVideoStream).then(() => {
      sendStreamMessage(
        {
          user: userInfo?.username,
          status: CMD_START_STREAM,
        },
        channelId
      ).then(() => {
        message.success({
          content: "start streaming",
        });
      });
    });
    return () => {
      if (localVideoStream) {
        rtcClient.unpublish(localVideoStream);
        localVideoStream.stop();
        sendStreamMessage(
          {
            user: userInfo?.username,
            status: CMD_END_STREAM,
          },
          channelId
        );
        message.info({
          content: "stop streaming",
        });
      }
    };
  }, [rtcClient, localStreaming, canvasRef, userInfo, channelId]);
最后总结一下房间的流程图
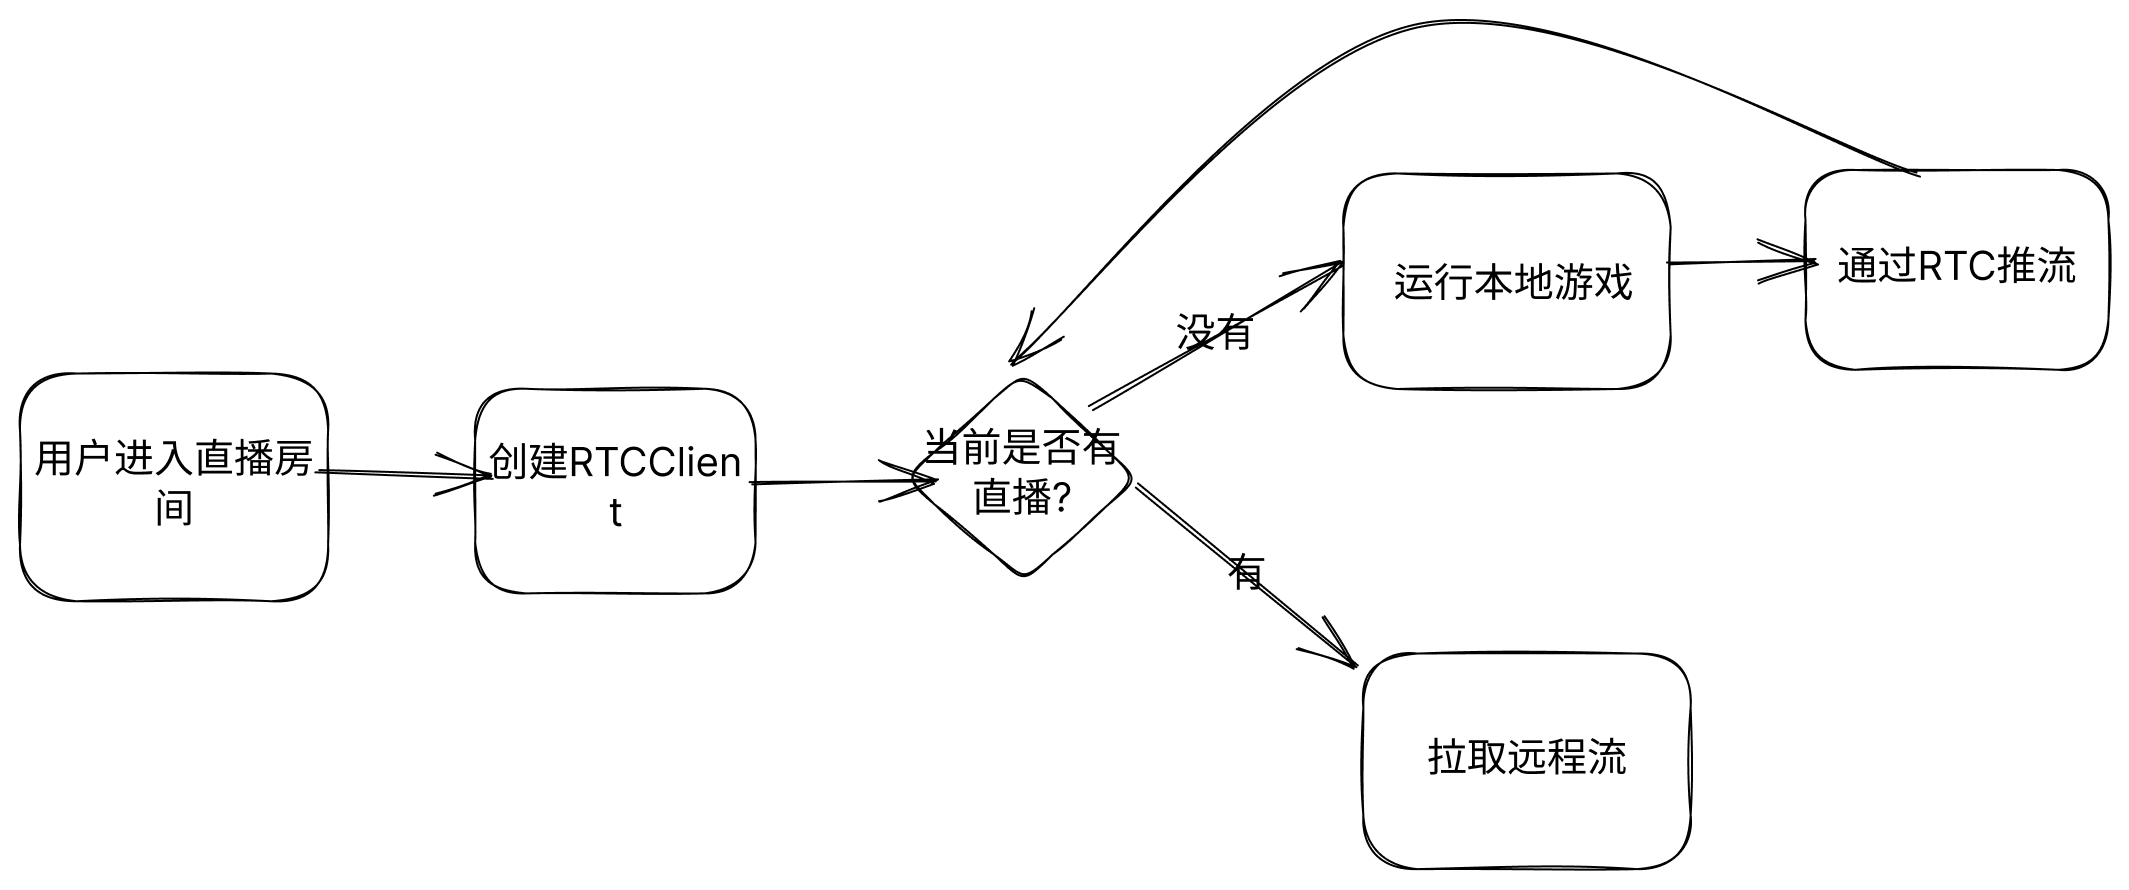 至此该项目的完整流程就算结束啦,如果有哪些步骤细节不太明确, 可以参照完整版项目
环信超级社区项目
注册环信
模拟器直播项目github源码获取