本文是我最近从入门到实战 Vue3 全家桶的 3 个项目后总结避坑经验,其实很多都是文档中有介绍的,只是刚开始不熟悉。
最近入门 Vue3 并完成 3 个项目,遇到问题蛮多的,今天就花点时间整理一下,和大家分享 15 个比较常见的问题,基本都贴出对应文档地址,还请多看文档~ 已经完成的 3 个项目基本都是使用 Vue3 (setup-script 模式)全家桶开发,因此主要分几个方面总结:
Vue3
Vite
VueRouter
Pinia
ElementPlus
一、Vue3
1. Vue2.x 和 Vue3.x 生命周期方法的变化
文档地址:https://v3.cn.vuejs.org/guide/composition-api-lifecycle-hooks.html
Vue2.x 和 Vue3.x 生命周期方法的变化蛮大的,先看看:
2.x 生命周期 | 3.x 生命周期 | 执行时间说明 |
beforeCreate | setup | 组件创建前执行 |
created | setup | 组件创建后执行 |
beforeMount | onBeforeMount | 组件挂载到节点上之前执行 |
mounted | onMounted | 组件挂载完成后执行 |
beforeUpdate | onBeforeUpdate | 组件更新之前执行 |
updated | onUpdated | 组件更新完成之后执行 |
beforeDestroy | onBeforeUnmount | 组件卸载之前执行 |
destroyed | onUnmounted | 组件卸载完成后执行 |
errorCaptured | onErrorCaptured | 当捕获一个来自子孙组件的异常时激活钩子函数 |
目前 Vue3.x 依然支持 Vue2.x 的生命周期,但不建议混搭使用,前期可以先使用 2.x 的生命周期,后面尽量使用 3.x 的生命周期开发。
由于我使用都是 script-srtup 模式,所以都是直接使用 Vue3.x 的生命周期函数:
// A.vue <script setup lang="ts"> import { ref, onMounted } from "vue"; let count = ref<number>(0); onMounted(() => { count.value = 1; }) </script>1.2.3.4.5.6.7.8.9.每个钩子的执行时机点,也可以看看文档:https://v3.cn.vuejs.org/guide/instance.html#生命周期图示
2. script-setup 模式中父组件获取子组件的数据
文档地址:https://v3.cn.vuejs.org/api/sfc-script-setup.html#defineexpose
这里主要介绍父组件如何去获取子组件内部定义的变量,关于父子组件通信,可以看文档介绍比较详细:https://v3.cn.vuejs.org/guide/component-basics.html
我们可以使用 全局编译器宏 的 defineExpose 宏,将子组件中需要暴露给父组件获取的参数,通过 {key: vlaue} 方式作为参数即可,父组件通过模版 ref 方式获取子组件实例,就能获取到对应值:
// 子组件 <script setup> let name = ref("pingan8787") defineExpose({ name }); // 显式暴露的数据,父组件才可以获取 </script> // 父组件 <Chlid ref="child"></Chlid> <script setup> let child = ref(null) child.value.name //获取子组件中 name 的值为 pingan8787 </script>1.2.3.4.5.6.7.8.9.10.11.12.注意:
全局编译器宏只能在 script-setup 模式下使用;
script-setup 模式下,使用宏时无需 import 可以直接使用;
script-setup 模式一共提供了 4 个宏,包括:defineProps、defineEmits、defineExpose、withDefaults。
3. 为 props 提供默认值
definedProps 文档:https://v3.cn.vuejs.org/api/sfc-script-setup.html#defineprops-%E5%92%8C-defineemitswithDefaults 文档:https://v3.cn.vuejs.org/api/sfc-script-setup.html#%E4%BB%85%E9%99%90-typescript-%E7%9A%84%E5%8A%9F%E8%83%BD
前面介绍 script-setup 模式提供的 4 个 全局编译器宏 ,还没有详细介绍,这一节介绍 defineProps 和 withDefaults 。使用 defineProps 宏可以用来定义组件的入参,使用如下:
<script setup lang="ts"> let props = defineProps<{ schema: AttrsValueObject; modelValue: any; }>(); </script>1.2.3.4.5.6.这里只定义 props 属性中的 schema 和 modelValue 两个属性的类型, defineProps 的这种声明的不足之处在于,它没有提供设置 props 默认值的方式。
其实我们可以通过 withDefaults 这个宏来实现:
<script setup lang="ts"> let props = withDefaults( defineProps<{ schema: AttrsValueObject; modelValue: any; }>(), { schema: [], modelValue: '' } ); </script>1.2.3.4.5.6.7.8.9.10.11.12.withDefaults 辅助函数提供了对默认值的类型检查,并确保返回的 props 的类型删除了已声明默认值的属性的可选标志。
4. 配置全局自定义参数
文档地址:https://v3.cn.vuejs.org/guide/migration/global-api.html#vue-prototype-%E6%9B%BF%E6%8D%A2%E4%B8%BA-config-globalproperties
在 Vue2.x 中我们可以通过 Vue.prototype 添加全局属性 property。但是在 Vue3.x 中需要将 Vue.prototype 替换为 config.globalProperties 配置:
// Vue2.x Vue.prototype.$api = axios; Vue.prototype.$eventBus = eventBus; // Vue3.x const app = createApp({}) app.config.globalProperties.$api = axios; app.config.globalProperties.$eventBus = eventBus;1.2.3.4.5.6.7.8.使用时需要先通过 vue 提供的 getCurrentInstance 方法获取实例对象:
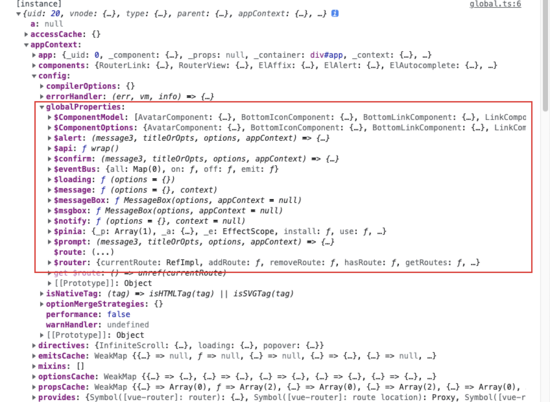
// A.vue <script setup lang="ts"> import { ref, onMounted, getCurrentInstance } from "vue"; onMounted(() => { const instance = <any>getCurrentInstance(); const { $api, $eventBus } = instance.appContext.config.globalProperties; // do something }) </script>1.2.3.4.5.6.7.8.9.10.11.其中 instance 内容输出如下:
5. v-model 变化
文档地址:https://v3.cn.vuejs.org/guide/migration/v-model.html
当我们在使用 v-model 指令的时候,实际上 v-bind 和 v-on 组合的简写,Vue2.x 和 Vue3.x 又存在差异。
Vue2.x
<ChildComponent v-model="pageTitle" /> <!-- 是以下的简写: --> <ChildComponent :value="pageTitle" @input="pageTitle = $event" />1.2.3.4.
在子组件中,如果要对某一个属性进行双向数据绑定,只要通过 this.$emit('update:myPropName', newValue) 就能更新其 v-model 绑定的值。
Vue3.x
<ChildComponent v-model="pageTitle" /> <!-- 是以下的简写: --> <ChildComponent :modelValue="pageTitle" @update:modelValue="pageTitle = $event"/>1.2.3.4.5.
script-setup 模式下就不能使用 this.$emit 去派发更新事件,毕竟没有 this ,这时候需要使用前面有介绍到的 defineProps、defineEmits 两个宏来实现:
// 子组件 child.vue // 文档:https://v3.cn.vuejs.org/api/sfc-script-setup.html#defineprops-%E5%92%8C-defineemits <script setup lang="ts"> import { ref, onMounted, watch } from "vue"; const emit = defineEmits(['update:modelValue']); // 定义需要派发的事件名称 let curValue = ref(''); let props = withDefaults(defineProps<{ modelValue: string; }>(), { modelValue: '', }) onMounted(() => { // 先将 v-model 传入的 modelValue 保存 curValue.value = props.modelValue; }) watch(curValue, (newVal, oldVal) => { // 当 curValue 变化,则通过 emit 派发更新 emit('update:modelValue', newVal) }) </script> <template> <div></div> </template> <style lang="scss" scoped></style>1.2.3.4.5.6.7.8.9.10.11.12.13.14.15.16.17.18.19.20.21.22.23.24.25.26.27.28.29.30.父组件使用的时候就很简单:
// 父组件 father.vue <script setup lang="ts"> import { ref, onMounted, watch } from "vue"; let curValue = ref(''); watch(curValue, (newVal, oldVal) => { console.log('[curValue 发生变化]', newVal) }) </script> <template> <Child v-model='curValue'></Child> </template> <style lang="scss" scoped></style>1.2.3.4.5.6.7.8.9.10.11.12.13.14.15.16.6. 开发环境报错不好排查
文档地址:https://v3.cn.vuejs.org/api/application-config.html#errorhandler
Vue3.x 对于一些开发过程中的异常,做了更友好的提示警告,比如下面这个提示: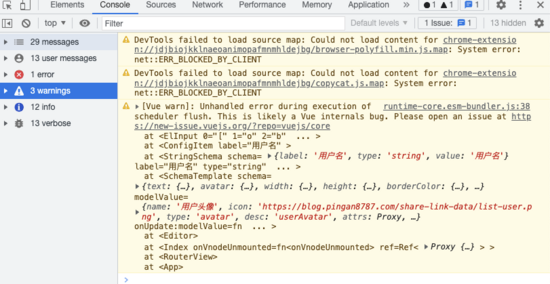
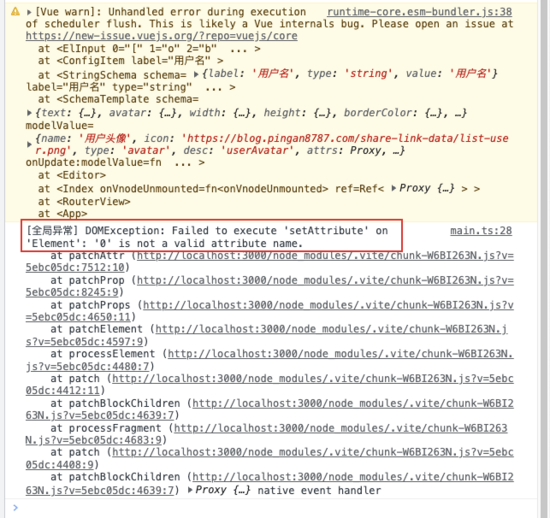
这样能够更清楚的告知异常的出处,可以看出大概是 <ElInput 0=...... 这边的问题,但还不够清楚。这时候就可以添加 Vue3.x 提供的 全局异常处理器 ,更清晰的 输出错误内容和调用栈信息,代码如下 :
// main.ts app.config.errorHandler = (err, vm, info) => { console.log('[全局异常]', err, vm, info) }1.2.3.4.这时候就能看到输出内容如下:
一下子就清楚很多。当然,该配置项也可以用来集成错误追踪服务 Sentry 和 Bugsnag。推荐阅读:Vue3 如何实现全局异常处理?
7. 观察 ref 的数据不直观,不方便
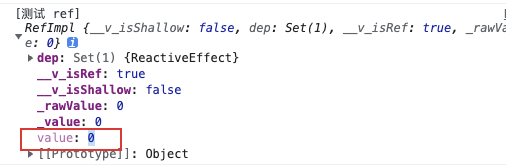
当我们在控制台输出 ref 声明的变量时。
const count = ref<numer>(0); console.log('[测试 ref]', count)1.2.3.会看到控制台输出了一个 RefImpl 对象:
看起来很不直观。我们都知道,要获取和修改 ref 声明的变量的值,需要通过 .value 来获取,所以你也可以:
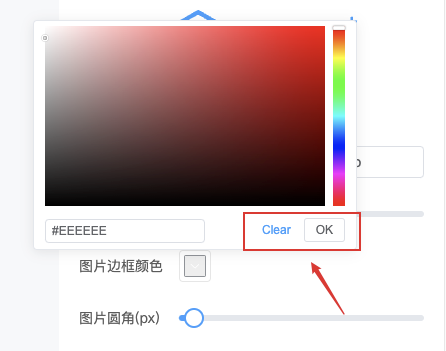
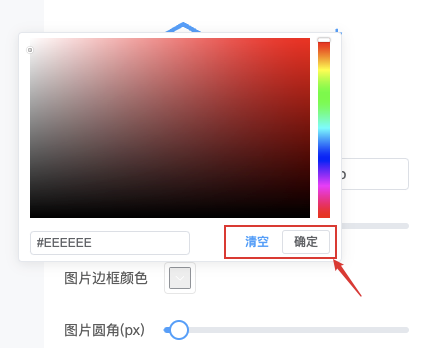
console.log('[测试 ref]', count.value);1.这里还有另一种方式,就是在控制台的设置面板中开启 「 Enable custom formatters 」选项。
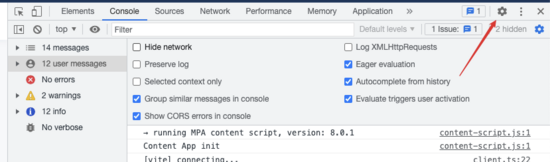 image.png
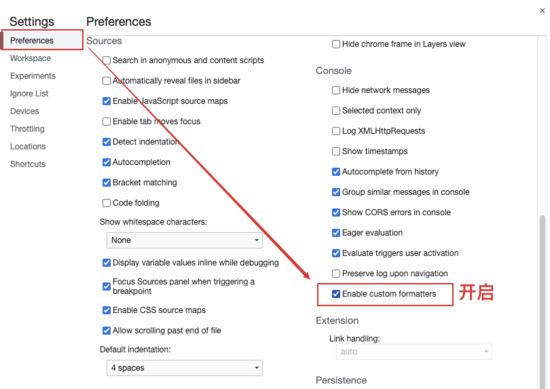
这时候你会发现,控制台输出的 ref 的格式发生变化了:
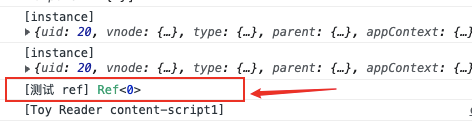
更加清晰直观了。
这个方法是我在《Vue.js 设计与实现》中发现的,但在文档也没有找到相关介绍,如果有朋友发现了,欢迎告知~
二、Vite
1. Vite 动态导入的使用问题
文档地址:https://cn.vitejs.dev/guide/features.html#glob-import
使用 webpack 的同学应该都知道,在 webpack 中可以通过 require.context 动态导入文件:
// https://webpack.js.org/guides/dependency-management/ require.context('./test', false, /\.test\.js$/);1.2.在 Vite 中,我们可以使用这两个方法来动态导入文件:
import.meta.glob
该方法匹配到的文件默认是 懒加载 ,通过 动态导入 实现,构建时会 分离独立的 chunk ,是 异步导入 ,返回的是 Promise,需要做异步操作,使用方式如下:
const Components = import.meta.glob('../components/**/*.vue'); // 转译后: const Components = { './components/a.vue': () => import('./components/a.vue'), './components/b.vue': () => import('./components/b.vue') }1.2.3.4.5.6.7.import.meta.globEager
该方法是 直接导入所有模块 ,并且是 同步导入 ,返回结果直接通过 for...in 循环就可以操作,使用方式如下:
const Components = import.meta.globEager('../components/**/*.vue'); // 转译后: import * as __glob__0_0 from './components/a.vue' import * as __glob__0_1 from './components/b.vue' const modules = { './components/a.vue': __glob__0_0, './components/b.vue': __glob__0_1 }1.2.3.4.5.6.7.8.9.如果仅仅使用异步导入 Vue3 组件,也可以直接使用 Vue3 defineAsyncComponent API 来加载:
// https://v3.cn.vuejs.org/api/global-api.html#defineasynccomponent import { defineAsyncComponent } from 'vue' const AsyncComp = defineAsyncComponent(() => import('./components/AsyncComponent.vue') ) app.component('async-component', AsyncComp)1.2.3.4.5.6.7.8.9.2. Vite 配置 alias 类型别名
文档地址:https://cn.vitejs.dev/config/#resolve-alias
当项目比较复杂的时候,经常需要配置 alias 路径别名来简化一些代码:
import Home from '@/views/Home.vue'1.
在 Vite 中配置也很简单,只需要在 vite.config.ts 的 resolve.alias 中配置即可:
// vite.config.ts export default defineConfig({ base: './', resolve: { alias: { "@": path.join(__dirname, "./src") }, } // 省略其他配置 })1.2.3.4.5.6.7.8.9.10.如果使用的是 TypeScript 时,编辑器会提示路径不存在的警告:warning:,这时候可以在 tsconfig.json 中添加 compilerOptions.paths 的配置:
{ "compilerOptions": { "paths": { "@/*": ["./src/*"] } } }1.2.3.4.5.6.7.3. Vite 配置全局 scss
文档地址:https://cn.vitejs.dev/config/#css-preprocessoroptions
当我们需要使用 scss 配置的主题变量(如 $primary )、mixin方法(如 @mixin lines )等时,如:
<script setup lang="ts"> </script> <template> <div class="container"></div> </template> <style scoped lang="scss"> .container{ color: $primary; @include lines; } </style>1.2.3.4.5.6.7.8.9.10.11.12.我们可以将 scss 主题配置文件,配置在 vite.config.ts 的 css.preprocessorOptions.scss.additionalData 中:
// vite.config.ts export default defineConfig({ base: './', css: { preprocessorOptions: { // 添加公共样式 scss: { additionalData: '@import "./src/style/style.scss";' } } }, plugins: [vue()] // 省略其他配置 })1.2.3.4.5.6.7.8.9.10.11.12.13.14.15.如果不想使用 scss 配置文件,也可以直接写成 scss 代码:
export default defineConfig({ css: { preprocessorOptions: { scss: { additionalData: '$primary: #993300' } } } })1.2.3.4.5.6.7.8.9.三、VueRouter
1. script-setup 模式下获取路由参数
文档地址:https://router.vuejs.org/zh/guide/advanced/composition-api.html
由于在 script-setup 模式下,没有 this 可以使用,就不能直接通过 this.$router 或 this.$route 来获取路由参数和跳转路由。当我们需要获取路由参数时,就可以使用 vue-router 提供的 useRoute 方法来获取,使用如下:
// A.vue <script setup lang="ts"> import { ref, onMounted } from 'vue'; import router from "@/router"; import { useRoute } from 'vue-router' let detailId = ref<string>(''); onMounted(() => { const route = useRoute(); detailId.value = route.params.id as string; // 获取参数 }) </script>1.2.3.4.5.6.7.8.9.10.11.12.13.14.15.如果要做路由跳转,就可以使用 useRouter 方法的返回值去跳转:
const router = useRouter(); router.push({ name: 'search', query: {/**/}, })1.2.3.4.5.四、Pinia
1. store 解构的变量修改后没有更新
文档地址:https://pinia.vuejs.org/core-concepts/#using-the-store
当我们解构出 store 的变量后,再修改 store 上该变量的值,视图没有更新:
// A.vue <script setup> import componentStore from "@/store/component"; const componentStoreObj = componentStore(); let { name } = componentStoreObj; const changeName = () => { componentStoreObj.name = 'hello pingan8787'; } </script> <template> <span @click="changeName">{{name}}</span> </template>1.2.3.4.5.6.7.8.9.10.11.12.13.14.15.这时候点击按钮触发 changeName 事件后,视图上的 name 并没有变化。这是因为 store 是个 reactive 对象,当进行解构后,会破坏它的响应性。所以我们不能直接进行解构。这种情况就可以使用 Pinia 提供 storeToRefs 工具方法,使用起来也很简单,只需要将需要解构的对象通过 storeToRefs 方法包裹,其他逻辑不变:
// A.vue <script setup> import componentStore from "@/store/component"; import { storeToRefs } from 'pinia'; const componentStoreObj = componentStore(); let { name } = storeToRefs(componentStoreObj); // 使用 storeToRefs 包裹 const changeName = () => { componentStoreObj.name = 'hello pingan8787'; } </script> <template> <span @click="changeName">{{name}}</span> </template>1.2.3.4.5.6.7.8.9.10.11.12.13.14.15.16.这样再修改其值,变更马上更新视图了。
2. Pinia 修改数据状态的方式
(1)按照官网给的方案,目前有三种方式修改:
通过 store.属性名 赋值修改单笔数据的状态;
这个方法就是前面一节使用的:
const changeName = () => { componentStoreObj.name = 'hello pingan8787'; }1.2.3.(2)通过 $patch 方法修改多笔数据的状态;
文档地址:https://pinia.vuejs.org/api/interfaces/pinia._StoreWithState.html#patch
当我们需要同时修改多笔数据的状态时,如果还是按照上面方法,可能要这么写:
const changeName = () => { componentStoreObj.name = 'hello pingan8787' componentStoreObj.age = '18' componentStoreObj.addr = 'xiamen' }1.2.3.4.5.上面这么写也没什么问题,但是 Pinia 官网已经说明,使用 $patch 的效率会更高,性能更好,所以在修改多笔数据时,更推荐使用 $patch ,使用方式也很简单:
const changeName = () => { // 参数类型1:对象 componentStoreObj.$patch({ name: 'hello pingan8787', age: '18', addr: 'xiamen', }) // 参数类型2:方法,该方法接收 store 中的 state 作为参数 componentStoreObj.$patch(state => { state.name = 'hello pingan8787'; state.age = '18'; state.addr = 'xiamen'; }) }1.2.3.4.5.6.7.8.9.10.11.12.13.14.15.(3)通过 action 方法修改多笔数据的状态;
也可以在 store 中定义 actions 的一个方法来更新:
// store.ts import { defineStore } from 'pinia'; export default defineStore({ id: 'testStore', state: () => { return { name: 'pingan8787', age: '10', addr: 'fujian' } }, actions: { updateState(){ this.name = 'hello pingan8787'; this.age = '18'; this.addr = 'xiamen'; } } })1.2.3.4.5.6.7.8.9.10.11.12.13.14.15.16.17.18.19.20.使用时:
const changeName = () => { componentStoreObj.updateState(); }1.2.3.这三种方式都能更新 Pinia 中 store 的数据状态。
五、Element Plus
1. element-plus 打包时 @charset 警告
项目新安装的 element-plus 在开发阶段都是正常,没有提示任何警告,但是在打包过程中,控制台输出下面警告内容:
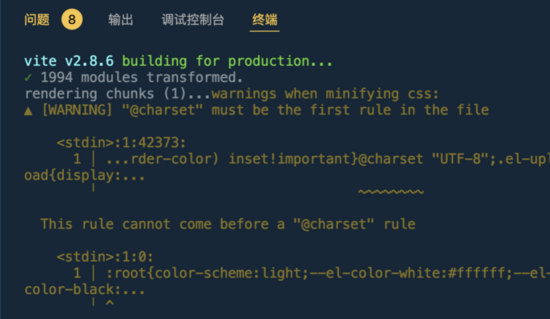
在官方 issues 中查阅很久:https://github.com/element-plus/element-plus/issues/3219。
尝试在 vite.config.ts 中配置 charset: false ,结果也是无效:
// vite.config.ts export default defineConfig({ css: { preprocessorOptions: { scss: { charset: false // 无效 } } } })1.2.3.4.5.6.7.8.9.10.最后在官方的 issues 中找到处理方法:
// vite.config.ts // https://blog.csdn.net/u010059669/article/details/121808645 css: { postcss: { plugins: [ // 移除打包element时的@charset警告 { postcssPlugin: 'internal:charset-removal', AtRule: { charset: (atRule) => { if (atRule.name === 'charset') { atRule.remove(); } } } } ], }, }1.2.3.4.5.6.7.8.9.10.11.12.13.14.15.16.17.18.19.20.2. 中文语言包配置
文档地址:https://element-plus.gitee.io/zh-CN/guide/i18n.html#%E5%85%A8%E5%B1%80%E9%85%8D%E7%BD%AE
默认 elemnt-plus 的组件是英文状态:
我们可以通过引入中文语言包,并添加到 ElementPlus 配置中来切换成中文:
// main.ts // ... 省略其他 import ElementPlus from 'element-plus'; import 'element-plus/dist/index.css'; import locale from 'element-plus/lib/locale/lang/zh-cn'; // element-plus 中文语言包 app.use(ElementPlus, { locale }); // 配置中文语言包1.2.3.4.5.6.7.8.这时候就能看到 ElementPlus 里面组件的文本变成中文了。
总结
以上是我最近从入门到实战 Vue3 全家桶的 3 个项目后总结避坑经验,其实很多都是文档中有介绍的,只是刚开始不熟悉。也希望大伙多看看文档咯~
Vue3 script-setup 模式确实越写越香。
责任编辑:张燕妮来源: 前端自习课