
图片æ¥è‡ª Pexels
网上关于实现 SSO çš„æ–‡ç« ä¸€å¤§å †ï¼Œä½†æ˜¯å½“ä½ çœŸçš„ç…§ç€å†™çš„时候就会å‘çŽ°æ ¹æœ¬ä¸æ˜¯é‚£ä¹ˆå›žäº‹å„¿ï¼Œç®€ç›´è®©äººæŠ“ç‹‚ï¼Œå°¤å…¶æ˜¯å¯¹äºŽæˆ‘è¿™æ ·çš„èœé¸Ÿã€‚
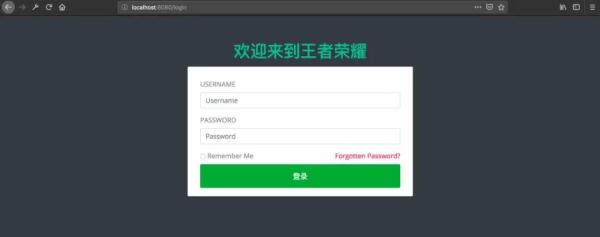
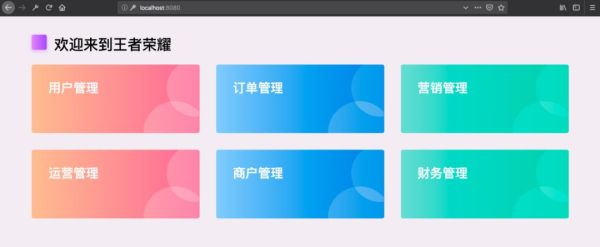
å‡ ç»æ›²æŠ˜ï¼Œç»ˆäºŽæžå®šäº†ï¼Œå†³å®šè®°å½•ä¸‹æ¥ï¼Œä»¥ä¾¿åŽç»æŸ¥çœ‹ã€‚å…ˆæ¥çœ‹ä¸€ä¸‹æ•ˆæžœï¼š

准备
â‘ å•ç‚¹ç™»å½•
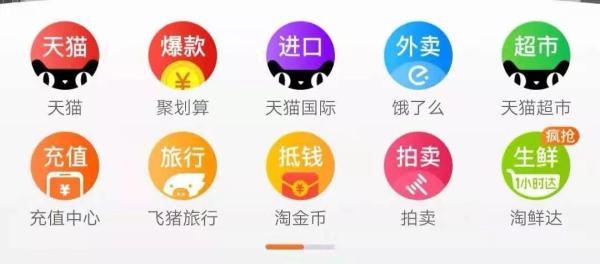
最常è§çš„例åæ˜¯ï¼Œæˆ‘ä»¬æ‰“å¼€æ·˜å® APP,首页就会有天猫ã€èšåˆ’ç®—ç‰æœåŠ¡çš„é“¾æŽ¥ï¼Œå½“ä½ ç‚¹å‡»ä»¥åŽå°±ç›´æŽ¥è·³è¿‡åŽ»äº†ï¼Œå¹¶æ²¡æœ‰è®©ä½ å†ç™»å½•ä¸€æ¬¡ã€‚
下é¢è¿™ä¸ªå›¾æ˜¯æˆ‘在网上找的,我觉得画得比较明白:
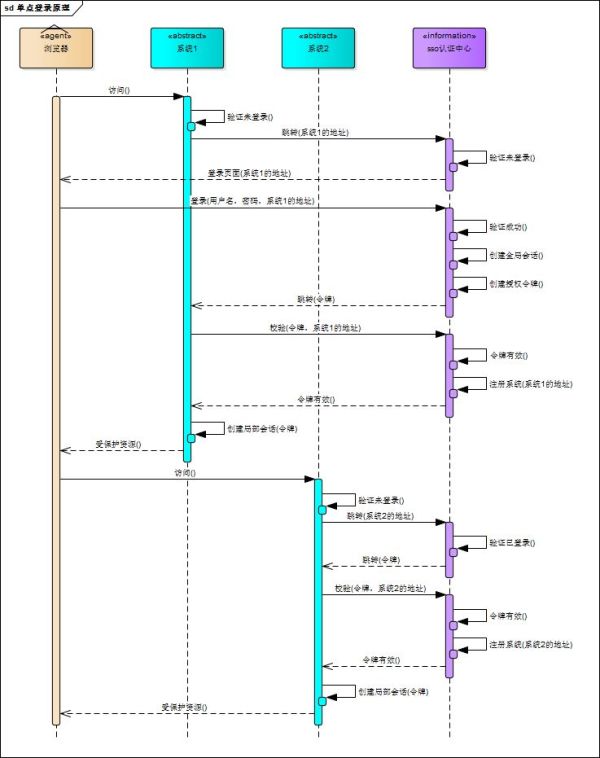
å¯æƒœæœ‰ç‚¹å„¿ä¸æ¸…晰,于是我åˆç”»äº†ä¸ªç®€ç‰ˆçš„:
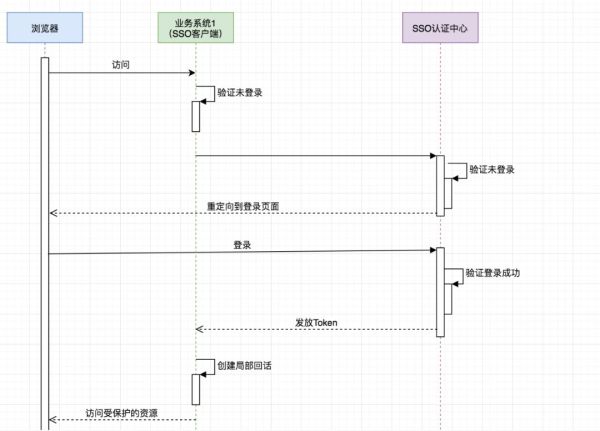
é‡è¦çš„是ç†è§£ï¼š
SSO æœåŠ¡ç«¯å’Œ SSO 客户端直接是通过授æƒä»¥åŽå‘放 Token çš„å½¢å¼æ¥è®¿é—®å—ä¿æŠ¤çš„资æºã€‚
相对于æµè§ˆå™¨æ¥è¯´ï¼Œä¸šåŠ¡ç³»ç»Ÿæ˜¯æœåŠ¡ç«¯ï¼Œç›¸å¯¹äºŽ SSO æœåŠ¡ç«¯æ¥è¯´ï¼Œä¸šåŠ¡ç³»ç»Ÿæ˜¯å®¢æˆ·ç«¯ã€‚
æµè§ˆå™¨å’Œä¸šåŠ¡ç³»ç»Ÿä¹‹é—´é€šè¿‡ä¼šè¯æ£å¸¸è®¿é—®ã€‚
ä¸æ˜¯æ¯æ¬¡æµè§ˆå™¨è¯·æ±‚都è¦åŽ» SSO æœåŠ¡ç«¯åŽ»éªŒè¯ï¼Œåªè¦æµè§ˆå™¨å’Œå®ƒæ‰€è®¿é—®çš„æœåŠ¡ç«¯çš„会è¯æœ‰æ•ˆå®ƒå°±å¯ä»¥æ£å¸¸è®¿é—®ã€‚
利用 OAuth2 实现å•ç‚¹ç™»å½•
接下æ¥ï¼Œåªè®²è·Ÿæœ¬ä¾‹ç›¸å…³çš„一些é…置,ä¸è®²åŽŸç†ï¼Œä¸è®²ä¸ºä»€ä¹ˆã€‚
众所周知,在 OAuth2 在有授æƒæœåŠ¡å™¨ã€èµ„æºæœåŠ¡å™¨ã€å®¢æˆ·ç«¯è¿™æ ·å‡ 个角色,当我们用它æ¥å®žçŽ° SSO 的时候是ä¸éœ€è¦èµ„æºæœåŠ¡å™¨è¿™ä¸ªè§’色的,有授æƒæœåŠ¡å™¨å’Œå®¢æˆ·ç«¯å°±å¤Ÿäº†ã€‚
授æƒæœåŠ¡å™¨å½“然是用æ¥åšè®¤è¯çš„,客户端就是å„个应用系统,我们åªéœ€è¦ç™»å½•æˆåŠŸåŽæ‹¿åˆ°ç”¨æˆ·ä¿¡æ¯ä»¥åŠç”¨æˆ·æ‰€æ‹¥æœ‰çš„æƒé™å³å¯ã€‚
之å‰æˆ‘一直认为把那些需è¦æƒé™æŽ§åˆ¶çš„资æºæ”¾åˆ°èµ„æºæœåŠ¡å™¨é‡Œä¿æŠ¤èµ·æ¥å°±å¯ä»¥å®žçŽ°æƒé™æŽ§åˆ¶ï¼Œå…¶å®žæ˜¯æˆ‘想错了,æƒé™æŽ§åˆ¶è¿˜å¾—通过 Spring Security 或者自定义拦截器æ¥åšã€‚
â‘ Spring Security ã€OAuth2ã€JWTã€SSO
在本例ä¸ï¼Œä¸€å®šè¦åˆ†æ¸…æ¥šè¿™å‡ ä¸ªçš„ä½œç”¨ï¼š
首先,SSO 是一ç§æ€æƒ³ï¼Œæˆ–者说是一ç§è§£å†³æ–¹æ¡ˆï¼Œæ˜¯æŠ½è±¡çš„,我们è¦åšçš„就是按照它的这ç§æ€æƒ³åŽ»å®žçŽ°å®ƒã€‚
其次,OAuth2 是用æ¥å…许用户授æƒç¬¬ä¸‰æ–¹åº”用访问他在å¦ä¸€ä¸ªæœåŠ¡å™¨ä¸Šçš„资æºçš„一ç§å议,它ä¸æ˜¯ç”¨æ¥åšå•ç‚¹ç™»å½•çš„,但我们å¯ä»¥åˆ©ç”¨å®ƒæ¥å®žçŽ°å•ç‚¹ç™»å½•ã€‚
在本例实现 SSO 的过程ä¸ï¼Œå—ä¿æŠ¤çš„资æºå°±æ˜¯ç”¨æˆ·çš„ä¿¡æ¯(包括,用户的基本信æ¯ï¼Œä»¥åŠç”¨æˆ·æ‰€å…·æœ‰çš„æƒé™)。
而我们想è¦è®¿é—®è¿™è¿™ä¸€èµ„æºå°±éœ€è¦ç”¨æˆ·ç™»å½•å¹¶æŽˆæƒï¼ŒOAuth2 æœåŠ¡ç«¯è´Ÿè´£ä»¤ç‰Œçš„å‘放ç‰æ“作,这令牌的生æˆæˆ‘们采用 JWT,也就是说 JWT 是用æ¥æ‰¿è½½ç”¨æˆ·çš„ Access_Token 的。
最åŽï¼ŒSpring Security 是用于安全访问的,这里我们我们用æ¥åšè®¿é—®æƒé™æŽ§åˆ¶ã€‚
认è¯æœåŠ¡å™¨é…ç½®
Maven ä¾èµ–:
4.0.0 org.springframework.boot spring-boot-starter-parent 2.1.3.RELEASE com.cjs.sso oauth2-sso-auth-server 0.0.1-SNAPSHOT oauth2-sso-auth-server 1.8 org.springframework.boot spring-boot-starter-data-jpa org.springframework.boot spring-boot-starter-data-redis org.springframework.boot spring-boot-starter-security org.springframework.security.oauth.boot spring-security-oauth2-autoconfigure 2.1.3.RELEASE org.springframework.boot spring-boot-starter-thymeleaf org.springframework.boot spring-boot-starter-web org.springframework.session spring-session-data-redis mysql mysql-connector-java runtime org.projectlombok lombok true org.springframework.boot spring-boot-starter-test test org.springframework.security spring-security-test test org.apache.commons commons-lang3 3.8.1 com.alibaba fastjson 1.2.56 org.springframework.boot spring-boot-maven-plugin
这里é¢æœ€é‡è¦çš„ä¾èµ–是:spring-security-oauth2-autoconfigure。
application.yml:
spring: datasource: url: jdbc:mysql://localhost:3306/permission username: root password: 123456 driver-class-name: com.mysql.jdbc.Driver jpa: show-sql: true session: store-type: redis redis: host: 127.0.0.1 password: 123456 port: 6379 server: port: 8080
AuthorizationServerConfig(é‡è¦):
package com.cjs.sso.config; import org.springframework.beans.factory.annotation.Autowired; import org.springframework.context.annotation.Bean; import org.springframework.context.annotation.Configuration; import org.springframework.context.annotation.Primary; import org.springframework.security.core.token.DefaultToken; import org.springframework.security.oauth2.config.annotation.configurers.ClientDetailsServiceConfigurer; import org.springframework.security.oauth2.config.annotation.web.configuration.AuthorizationServerConfigurerAdapter; import org.springframework.security.oauth2.config.annotation.web.configuration.EnableAuthorizationServer; import org.springframework.security.oauth2.config.annotation.web.configurers.AuthorizationServerEndpointsConfigurer; import org.springframework.security.oauth2.config.annotation.web.configurers.AuthorizationServerSecurityConfigurer; import org.springframework.security.oauth2.provider.token.DefaultTokenServices; import org.springframework.security.oauth2.provider.token.TokenStore; import org.springframework.security.oauth2.provider.token.store.JwtAccessTokenConverter; import org.springframework.security.oauth2.provider.token.store.JwtTokenStore; import javax.sql.DataSource; /** * @author ChengJianSheng * @date 2019-02-11 */ @Configuration @EnableAuthorizationServer public class AuthorizationServerConfig extends AuthorizationServerConfigurerAdapter { @Autowired private DataSource dataSource; @Override public void configure(AuthorizationServerSecurityConfigurer security) throws Exception { security.allowFormAuthenticationForClients(); security.tokenKeyAccess("isAuthenticated()"); } @Override public void configure(ClientDetailsServiceConfigurer clients) throws Exception { clients.jdbc(dataSource); } @Override public void configure(AuthorizationServerEndpointsConfigurer endpoints) throws Exception { endpoints.accessTokenConverter(jwtAccessTokenConverter()); endpoints.tokenStore(jwtTokenStore()); // endpoints.tokenServices(defaultTokenServices()); } /*@Primary @Bean public DefaultTokenServices defaultTokenServices() { DefaultTokenServices defaultTokenServices = new DefaultTokenServices(); defaultTokenServices.setTokenStore(jwtTokenStore()); defaultTokenServices.setSupportRefreshToken(true); return defaultTokenServices; }*/ @Bean public JwtTokenStore jwtTokenStore() { return new JwtTokenStore(jwtAccessTokenConverter()); } @Bean public JwtAccessTokenConverter jwtAccessTokenConverter() { JwtAccessTokenConverter jwtAccessTokenConverter = new JwtAccessTokenConverter(); jwtAccessTokenConverter.setSigningKey("cjs"); // Sets the JWT signing key return jwtAccessTokenConverter; } }
说明:
别忘了 @EnableAuthorizationServer。
Token å˜å‚¨é‡‡ç”¨çš„是 JWT。
客户端以åŠç™»å½•ç”¨æˆ·è¿™äº›é…ç½®å˜å‚¨åœ¨æ•°æ®åº“,为了å‡å°‘æ•°æ®åº“的查询次数,å¯ä»¥ä»Žæ•°æ®åº“读出æ¥ä»¥åŽå†æ”¾åˆ°å†…å˜ä¸ã€‚
WebSecurityConfig(é‡è¦):
package com.cjs.sso.config; import com.cjs.sso.service.MyUserDetailsService; import org.springframework.beans.factory.annotation.Autowired; import org.springframework.context.annotation.Bean; import org.springframework.context.annotation.Configuration; import org.springframework.security.config.annotation.authentication.builders.AuthenticationManagerBuilder; import org.springframework.security.config.annotation.web.builders.HttpSecurity; import org.springframework.security.config.annotation.web.builders.WebSecurity; import org.springframework.security.config.annotation.web.configuration.EnableWebSecurity; import org.springframework.security.config.annotation.web.configuration.WebSecurityConfigurerAdapter; import org.springframework.security.crypto.bcrypt.BCryptPasswordEncoder; import org.springframework.security.crypto.password.PasswordEncoder; /** * @author ChengJianSheng * @date 2019-02-11 */ @Configuration @EnableWebSecurity public class WebSecurityConfig extends WebSecurityConfigurerAdapter { @Autowired private MyUserDetailsService userDetailsService; @Override protected void configure(AuthenticationManagerBuilder auth) throws Exception { auth.userDetailsService(userDetailsService).passwordEncoder(passwordEncoder()); } @Override public void configure(WebSecurity web) throws Exception { web.ignoring().antMatchers("/assets/**", "/css/**", "/images/**"); } @Override protected void configure(HttpSecurity http) throws Exception { http.formLogin() .loginPage("/login") .and() .authorizeRequests() .antMatchers("/login").permitAll() .anyRequest() .authenticated() .and().csrf().disable().cors(); } @Bean public PasswordEncoder passwordEncoder() { return new BCryptPasswordEncoder(); } }
自定义登录页é¢(一般æ¥è®²éƒ½æ˜¯è¦è‡ªå®šä¹‰çš„):
package com.cjs.sso.controller; import org.springframework.stereotype.Controller; import org.springframework.web.bind.annotation.GetMapping; /** * @author ChengJianSheng * @date 2019-02-12 */ @Controller public class LoginController { @GetMapping("/login") public String login() { return "login"; } @GetMapping("/") public String index() { return "index"; } }
自定义登录页é¢çš„时候,åªéœ€è¦å‡†å¤‡ä¸€ä¸ªç™»å½•é¡µé¢ï¼Œç„¶åŽå†™ä¸ª Controller 令其å¯ä»¥è®¿é—®åˆ°å³å¯ï¼Œç™»å½•é¡µé¢è¡¨å•æ交的时候 method 一定è¦æ˜¯ post,最é‡è¦çš„时候 action è¦è·Ÿè®¿é—®ç™»å½•é¡µé¢çš„ url ä¸€æ ·ã€‚
åƒä¸‡è®°ä½äº†ï¼Œè®¿é—®ç™»å½•é¡µé¢çš„时候是 GET 请求,表å•æ交的时候是 POST 请求,其他的就ä¸ç”¨ç®¡äº†ã€‚
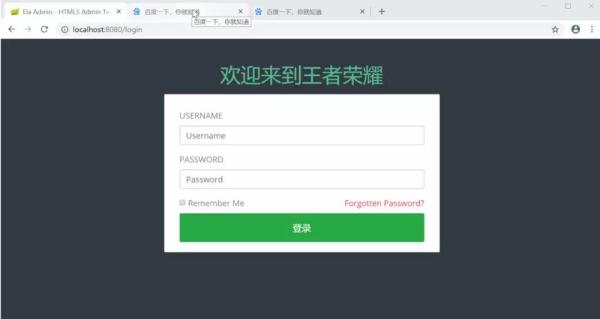
Ela Admin - HTML5 Admin Template 欢迎æ¥åˆ°çŽ‹è€…è£è€€
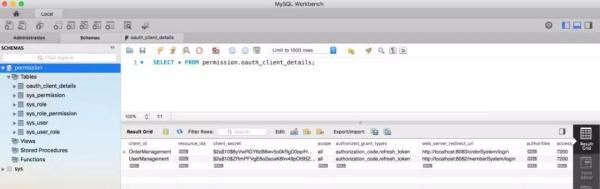
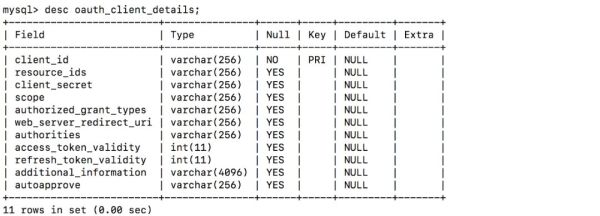
定义客户端,如下图:
åŠ è½½ç”¨æˆ·ï¼Œç™»å½•è´¦æˆ·ï¼š
package com.cjs.sso.domain; import lombok.Data; import org.springframework.security.core.GrantedAuthority; import org.springframework.security.core.userdetails.User; import java.util.Collection; /** * 大部分时候直接用Userå³å¯ä¸å¿…扩展 * @author ChengJianSheng * @date 2019-02-11 */ @Data public class MyUser extends User { private Integer departmentId; // 举个例å,部门ID private String mobile; // 举个例å,å‡è®¾æˆ‘ä»¬æƒ³å¢žåŠ ä¸€ä¸ªå—æ®µï¼Œè¿™é‡Œæˆ‘ä»¬å¢žåŠ ä¸€ä¸ªmobileè¡¨ç¤ºæ‰‹æœºå· public MyUser(String username, String password, Collection extends GrantedAuthority> authorities) { super(username, password, authorities); } public MyUser(String username, String password, boolean enabled, boolean accountNonExpired, boolean credentialsNonExpired, boolean accountNonLocked, Collection extends GrantedAuthority> authorities) { super(username, password, enabled, accountNonExpired, credentialsNonExpired, accountNonLocked, authorities); } }
åŠ è½½ç™»å½•è´¦æˆ·ï¼š
package com.cjs.sso.service; import com.alibaba.fastjson.JSON; import com.cjs.sso.domain.MyUser; import com.cjs.sso.entity.SysPermission; import com.cjs.sso.entity.SysUser; import lombok.extern.slf4j.Slf4j; import org.springframework.beans.factory.annotation.Autowired; import org.springframework.security.core.authority.SimpleGrantedAuthority; import org.springframework.security.core.userdetails.UserDetails; import org.springframework.security.core.userdetails.UserDetailsService; import org.springframework.security.core.userdetails.UsernameNotFoundException; import org.springframework.security.crypto.password.PasswordEncoder; import org.springframework.stereotype.Service; import org.springframework.util.CollectionUtils; import java.util.ArrayList; import java.util.List; /** * @author ChengJianSheng * @date 2019-02-11 */ @Slf4j @Service public class MyUserDetailsService implements UserDetailsService { @Autowired private PasswordEncoder passwordEncoder; @Autowired private UserService userService; @Autowired private PermissionService permissionService; @Override public UserDetails loadUserByUsername(String username) throws UsernameNotFoundException { SysUser sysUser = userService.getByUsername(username); if (null == sysUser) { log.warn("用户{}ä¸å˜åœ¨", username); throw new UsernameNotFoundException(username); } List permissionList = permissionService.findByUserId(sysUser.getId()); List authorityList = new ArrayList<>(); if (!CollectionUtils.isEmpty(permissionList)) { for (SysPermission sysPermission : permissionList) { authorityList.add(new SimpleGrantedAuthority(sysPermission.getCode())); } } MyUser myUser = new MyUser(sysUser.getUsername(), passwordEncoder.encode(sysUser.getPassword()), authorityList); log.info("登录æˆåŠŸï¼ç”¨æˆ·: {}", JSON.toJSONString(myUser)); return myUser; } }
验è¯ï¼š
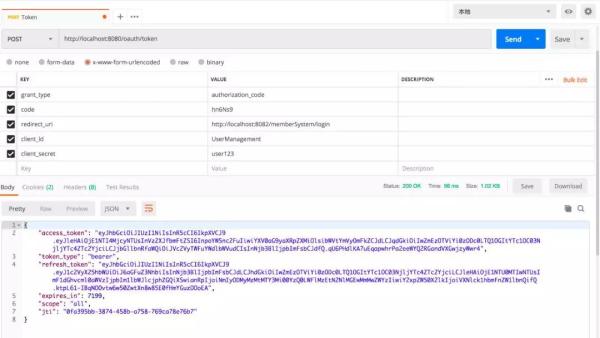
当我们看到这个界é¢çš„时候,表示认è¯æœåŠ¡å™¨é…置完æˆã€‚
两个客户端
Maven ä¾èµ–:
4.0.0 org.springframework.boot spring-boot-starter-parent 2.1.3.RELEASE com.cjs.sso oauth2-sso-client-member 0.0.1-SNAPSHOT oauth2-sso-client-member Demo project for Spring Boot 1.8 org.springframework.boot spring-boot-starter-data-jpa org.springframework.boot spring-boot-starter-oauth2-client org.springframework.boot spring-boot-starter-security org.springframework.security.oauth.boot spring-security-oauth2-autoconfigure 2.1.3.RELEASE org.springframework.boot spring-boot-starter-thymeleaf org.thymeleaf.extras thymeleaf-extras-springsecurity5 3.0.4.RELEASE org.springframework.boot spring-boot-starter-web com.h2database h2 runtime org.projectlombok lombok true org.springframework.boot spring-boot-starter-test test org.springframework.security spring-security-test test org.springframework.boot spring-boot-maven-plugin
application.yml:
server: port: 8082 servlet: context-path: /memberSystem security: oauth2: client: client-id: UserManagement client-secret: user123 access-token-uri: http://localhost:8080/oauth/token user-authorization-uri: http://localhost:8080/oauth/authorize resource: jwt: key-uri: http://localhost:8080/oauth/token_key
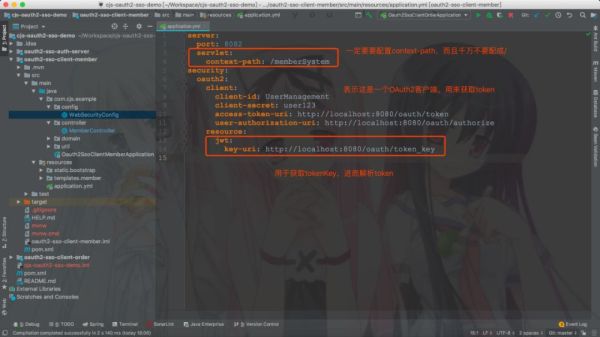
这里 context-path ä¸è¦è®¾æˆ /,ä¸ç„¶é‡å®šå‘èŽ·å– code 的时候回被拦截。
WebSecurityConfig:
package com.cjs.example.config; import com.cjs.example.util.EnvironmentUtils; import org.springframework.beans.factory.annotation.Autowired; import org.springframework.boot.autoconfigure.security.oauth2.client.EnableOAuth2Sso; import org.springframework.context.annotation.Configuration; import org.springframework.security.config.annotation.web.builders.HttpSecurity; import org.springframework.security.config.annotation.web.builders.WebSecurity; import org.springframework.security.config.annotation.web.configuration.WebSecurityConfigurerAdapter; /** * @author ChengJianSheng * @date 2019-03-03 */ @EnableOAuth2Sso @Configuration public class WebSecurityConfig extends WebSecurityConfigurerAdapter { @Autowired private EnvironmentUtils environmentUtils; @Override public void configure(WebSecurity web) throws Exception { web.ignoring().antMatchers("/bootstrap/**"); } @Override protected void configure(HttpSecurity http) throws Exception { if ("local".equals(environmentUtils.getActiveProfile())) { http.authorizeRequests().anyRequest().permitAll(); }else { http.logout().logoutSuccessUrl("http://localhost:8080/logout") .and() .authorizeRequests() .anyRequest().authenticated() .and() .csrf().disable(); } } }
说明:
最é‡è¦çš„注解是 @EnableOAuth2Sso。
æƒé™æŽ§åˆ¶è¿™é‡Œé‡‡ç”¨ Spring Security æ–¹æ³•çº§åˆ«çš„è®¿é—®æŽ§åˆ¶ï¼Œç»“åˆ Thymeleaf å¯ä»¥å¾ˆå®¹æ˜“åšæƒé™æŽ§åˆ¶ã€‚
顺便多æ一å¥ï¼Œå¦‚果是å‰åŽç«¯åˆ†ç¦»çš„è¯ï¼Œå‰ç«¯éœ€æ±‚åŠ è½½ç”¨æˆ·çš„æƒé™ï¼Œç„¶åŽåˆ¤æ–应该显示那些按钮那些èœå•ã€‚
MemberController:
package com.cjs.example.controller; import org.springframework.security.access.prepost.PreAuthorize; import org.springframework.security.core.Authentication; import org.springframework.stereotype.Controller; import org.springframework.web.bind.annotation.GetMapping; import org.springframework.web.bind.annotation.PostMapping; import org.springframework.web.bind.annotation.RequestMapping; import org.springframework.web.bind.annotation.ResponseBody; import java.security.Principal; /** * @author ChengJianSheng * @date 2019-03-03 */ @Controller @RequestMapping("/member") public class MemberController { @GetMapping("/list") public String list() { return "member/list"; } @GetMapping("/info") @ResponseBody public Principal info(Principal principal) { return principal; } @GetMapping("/me") @ResponseBody public Authentication me(Authentication authentication) { return authentication; } @PreAuthorize("hasAuthority('member:save')") @ResponseBody @PostMapping("/add") public String add() { return "add"; } @PreAuthorize("hasAuthority('member:detail')") @ResponseBody @GetMapping("/detail") public String detail() { return "detail"; } }
Order é¡¹ç›®è·Ÿå®ƒæ˜¯ä¸€æ ·çš„ï¼š
server: port: 8083 servlet: context-path: /orderSystem security: oauth2: client: client-id: OrderManagement client-secret: order123 access-token-uri: http://localhost:8080/oauth/token user-authorization-uri: http://localhost:8080/oauth/authorize resource: jwt: key-uri: http://localhost:8080/oauth/token_key
关于退出:退出就是清空用于与 SSO 客户端建立的所有的会è¯ï¼Œç®€å•çš„æ¥è¯´å°±æ˜¯ä½¿æ‰€æœ‰ç«¯ç‚¹çš„ Session 失效,如果想åšå¾—更好的è¯å¯ä»¥ä»¤ Token 失效,但是由于我们用的 JWT,故而撤销 Token å°±ä¸æ˜¯é‚£ä¹ˆå®¹æ˜“,关于这一点,在官网上也有æ到:

本例ä¸é‡‡ç”¨çš„æ–¹å¼æ˜¯åœ¨é€€å‡ºçš„时候先退出业务æœåŠ¡å™¨ï¼ŒæˆåŠŸä»¥åŽå†å›žè°ƒè®¤è¯æœåŠ¡å™¨ï¼Œä½†æ˜¯è¿™æ ·æœ‰ä¸€ä¸ªé—®é¢˜ï¼Œå°±æ˜¯éœ€è¦ä¸»åŠ¨ä¾æ¬¡è°ƒç”¨å„个业务æœåŠ¡å™¨çš„ logout。
工程结构
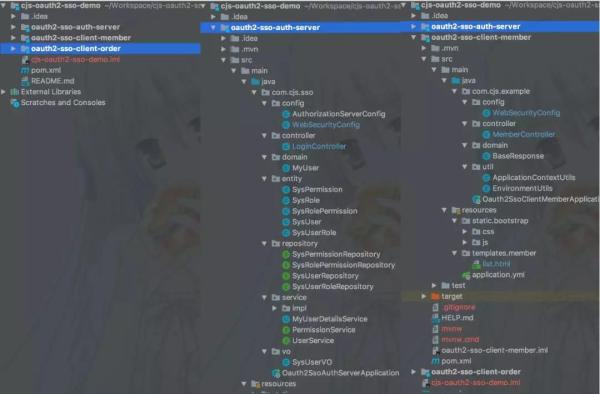
附上æºç :
https://github.com/chengjiansheng/cjs-oauth2-sso-demo.git
演示
作者:废物大师兄
编辑:陶家龙
出处:cnblogs.com/cjsblog/p/10548022.html